Before installing your new mast, compare the old mast with the new one.
They need to be identical in every way. If they are different, you may have
an after market power unit. Also it is very important that you
NEVER
cut the white cable on the new mast at any time.
Removing the Mast:
1. Remove the special
nut, ( by turning counter clockwise, looking down at it ), along
with the Grommet and Gasket.
[
Photo 2
] below shows a socket being used, but a common small needle nose
pliers can be used as well by sticking the nose of the needle nose pliers
into the slits and
turning counter clockwise, looking down at it,
... See [ Photo 2
] below showing
it being done ..... OR ...... You can use a Small Screw Driver as well,
see [ Photo 1]
below showing it being done.
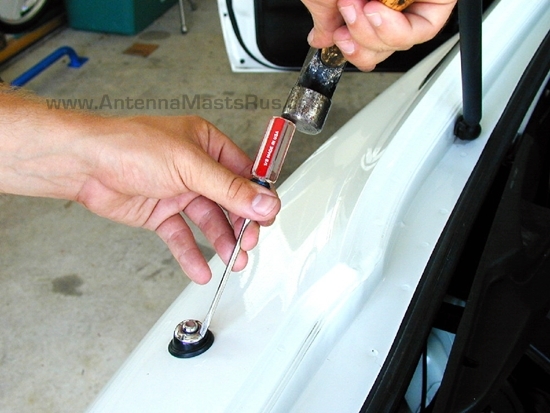
This photo shows the nut being Tightened
...
PHOTO 1
2. Then as you have someone turning the radio on, and as the mast begins or
tries to come up, ... grab hold of it and assist it out as the power unit
feeds the mast out, as the [
Photo 2 ] below shows the mast
coming out as the radio has been turned on ... taking note which direction
the teeth on the plastic cable are facing ( the teeth will face
either toward the front or the rear of your car ) so you know
which way the new mast cable is to face when you put it in ....
If you are not sure which way the
teeth face, look at [ Photo 2 ] below, note that the teeth face the
main gear assembly when the mast is inserted into the storage drum, ..
determine which way the teeth will be by looking at your power unit,
again it will always face the main drive gear assembly.

Photo 2
Make sure that the short outer grounding/retaining sleeve ( as what is
on the outer portion of NEW antenna mast ) [ See
PHOTO 3 Below ] has come out with
the old mast, this is very important, as this is what holds the antenna
mast in when the nut is fastened, as it holds down the mast ..... Honda
and Acura cars are notorious for only half of the sleeve coming out when
the mast is removed.
IF the old mast and grounding/retaining sleeve are out then
proceed with
STEP 4
below ....... If you cant get the mast out proceed with the
STEP 3
below.
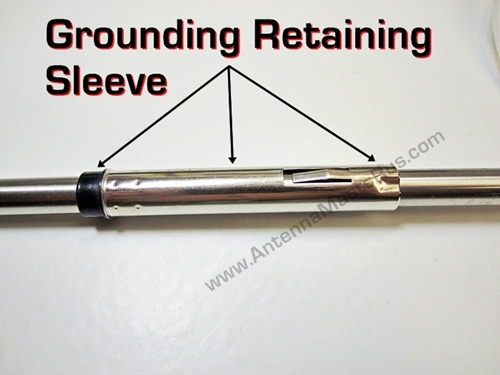
PHOTO 3
3.
If at this time you can’t pull the mast out and it seems to be stuck, more
than likely the grounding/retaining sleeve is corroded to the top of the
antenna Storage Tube where it does its job holding in the mast and giving
it reception. Being that this part doesn't move, after time it corrodes
its self in its position. Many people think that the tabs on the sleeve
hold it in, this is not true, they are there to give the mast reception
only, period. ...
What we found that works best in removing a stuck mast is cut the
largest mast tube 1 inch from the top of the largest section of the mast,
so you can fill the hollow of it with a drill bit so that when you put a
vise grip on that mast it will not collapse. By doing this it also allows
you to put major force on the vice grip so you can now take a hammer and
hit the vise grip in such a way so you can hit the mast out. If at this
time the old mast comes out proceed with installing a mast below
Step 4.
Installing the Mast:
4. Compare
the old mast with the new one, the length of the white teethed cable MUST
be the same length of the one you took out of your power unit ( DO NOT CUT
THE NEW MAST CABLE ) .... If the cable is not the same
length, then you probably have a broken piece left in your power unit ....
If the cable is shorter proceed with Step 5 .... If the over all
Collapse
length of the stainless portion of
the new mast and diameter are the same with the old mast, along with the
white cable length continue with Step 6.
5. There are occasions
where the antenna cable breaks off in the power unit and this will not
allow the replacement mast to be pulled in all the way, because the
storage drum can only hold enough cable for one mast.
In this event you will have to REMOVE THE POWER assembly from the car [
SEE
PHOTO 4
]
BELOW
as
to how in General Mounting of a power unit is.
PHOTO
4
For a REAR MOUNTED ANTENNA, go to
your trunk remove the power unit from the car. Now remove the cover from
the power unit, once this is done you will see a circular plastic
doughnut looking drum, pull it out and in it will be your broken cable.
This is not a difficult job, its nothing more than removing some screws
and bolts, nothing will ever spring out at you when you remove the drum
cover ... Once the cable is out, clean the grease out of that drum
assembly and put some new grease in, which can be any wheel bearing
grease, do this before you reassemble the power unit. See
Photo 5
below for how in general a cover and drum will look like.
Now reverse what you just did and reinstall
the power unit in the car and proceed with,
Step 6.
For a FRONT FENDER MOUNTED ANTENNA,
first remove your right front tire from the car. Then under the fender
you will see a plastic pan or shield, remove it. Once that pan is removed
then you unbolt the power unit from the chassis of the vehicle and let it
dangle under the fender so you can work on it. Now remove the only
cover from the power unit, once this is done you will see a circular
plastic doughnut looking drum, pull it out and in it will be your broken
cable. This is not a difficult job, its nothing more than removing some
screws and bolts, nothing will ever spring out at you when you remove the
drum cover ... Once the cable is out, clean the grease out of that drum
assembly and put some new grease in, which can be any wheel bearing
grease, do this before you reassemble the power unit. See
Photo 5
below for how in general a cover and drum will look like.
Now reverse what you just did and
reinstall the power unit in the car and proceed with,
Step 6.
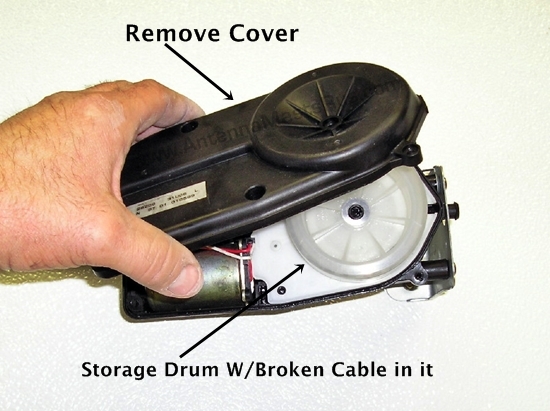
Cover is held on with Screws ... Drum Simply pulls out.
PHOTO 5
6.
Insert the new mast
cable into the top of the power antenna tube with the teeth facing toward
the direction that it was when you removed the broken mast ... (
SEE PHOTO BELOW ) Then have someone turn the
radio off,.. as the power unit begins to pull the new mast in, guide the
new antenna into the power unit, as it pulls the mast down into the power
unit, it may on the first try not pull the mast all the way down, don’t
worry, install the grounding sleeve and the outer nut and turn the radio
on and off a few times as this will center the new antenna mast. then,
"Voila! The mast is installed."
|
|
© Copywrite 1999-2026 The Antenna Source All
Rights Reserved
|